

What Size To Create Logo In Illustrator
There is really no way around it. Creating logo packages is often like raking leaves with a toothpick – especially if your arroyo is to create logo files one at a fourth dimension.
If you're making logo packages manually like this, you tin say goodbye to an hour or more of valuable design time and hullo to centre-watering boredom, because it's going to take forever.
I made logo packages 1 by i for many years. Big fat 100+ file packages likewise. It was always a painful stride in an otherwise creative and rewarding procedure. Making logo packages this way came with a host of other problems likewise — accidentally overwriting files as I duplicated them, having to name each file manually, recoloring artwork over and over…
Fortunately, there is a style you can make dozens of logo files in all the formats you need fairly apace, and I'm going to share it with you in this post.
Instead of packaging logos one at a time like a neanderthal with sticks and stones, you can use Illustrator files with multiple artboards to creepo out dozens of logo files like an android on steroids.
It's pretty like shooting fish in a barrel also. Here'south how you do it.
Create i Illustrator document to export print logos and and some other for digital logos
You lot don't need to make them at the same time, simply information technology'due south important to have both. Your document for print logos should be set to the CMYK color manner. The impress document volition include both CMYK and Pantone logos. The file for digital logos needs to be set to the RGB colour mode.
Setting these color modes is crucial because your color mixes for CMYK and RGB will be contradistinct depending on the colour way of the document. You may accept a beautiful blood-red with values c=0 m=100 y=80 yard=0. In the CMYK color way, everything is perfect, but if the document color manner is RGB the values are now c=1 g=100 y=79 k=0. The same is true for RGB values.
I'm going to start with the CMYK document for print logos.

Name your logo file with your client's name or prefix
In later steps we will be labeling our artboards so that our logo files will exist perfectly named upon export. You'll want to name your file with your client'southward name and then that information technology is always the outset part of the file proper name when we export.
Fix your document with multiple artboards
These artboards should be no bigger than four inches square. 4 inches is bigger than any standard logo really needs to be. 15 artboards is a practiced number to outset with because information technology accommodates nigh of the permutations your logo is going to have, just you may take more or less depending on your needs.

Make a separate artboard for every logo variation you need
Variations include things like the logo's configuration or layout, its color scheme, and color gamut. Here is 1 possible set up of variations.
Configurations
- Full logo
- logotype
- logo mark
Colour Scheme
- full colour
- 1 color
- reverse
- grayscale
Color Gamut
- CMYK
- Pantone U
- Pantone C
- RBG
Label artboards co-ordinate to your naming convention
When you export these artboards, the resulting files will contain the artboard proper noun. Naming them using your logo file naming convention is a hack to ensure that all your files are already properly named when y'all export them. If you lot don't know how to name your files, read my post about the best file naming convention for logos. Your clients will thank you. Here'due south an case of how I label my artboards.

Copy your logo into every artboard
Your logo pattern should live in an entirely dissimilar document than the documents you are creating to export your logo variations. Open up your logo blueprint file and copy the artwork into the document y'all've created with multiple artboards.
Information technology's important that you lot re-create the artwork from one file to another instead of dragging an illustrator file into the export certificate from finder or placing a file in your export document. Artwork that is copied in can be modified, dragged or placed files cannot.
If your logo artwork comes in larger than the artboards, only scale information technology down. Like I said before, iv inches is enough big enough for almost any logo — peculiarly since nosotros're dealing with vectors.
Here's a pro keyboard shortcut for pasting your logo into all of the artboards at once:
Shift + Selection + Control + v on Mac
Shift + Alt + Control + 5 on PC.

Recolor your logos according to the artboard labels and remove unnecessary components
Utilise your CMYK and Pantone colors to the appropriate artwork.
If you demand help picking Pantone colors, read my post about the fastest fashion to catechumen CMYK or RGB to Pantone — you don't even have to use a swatch book.
Colour the i-color versions of your logos black and the contrary versions of your logo white. If your logo contains a marker and a logotype, you lot'll want to have artboards for only those components as well. Delete the necessary components so that only the appropriate components remain on their corresponding artboards.
You may besides take redundant logos. If your logotype is black for example, you won't need a 1-color and total-colour version of the logotype because they would exist identical. Delete whatever redundant logos as well.

Delete empty artboards
Since you lot volition exist exporting all the artboards in your document as split up files, you lot demand to delete empty artboards and then you don't end upwards with a bunch of blank files. Unless you like playing tricks on your clients, and so become for it.
Y'all can easily delete all the empty artboards by selecting "Delete Empty Artboards" from the flyout carte du jour in the Artboards panel.

Resize artboards to fit the logo artwork
Right up at that place next to blank files on the list of annoying things to observe in a logo package are logo files with huge amounts of blank infinite or padding around them. When y'all or another designer has to identify your logo file into InDesign or some other blueprint application, the final matter they want to practise is to crop in on your logo. Y'all can ensure that your artboards are fit snuggly to the artwork they comprise by going to Object > Artboards > Fit to Artwork Bounds.

Export AI and EPS file formats using "Relieve As"
Now for the moment you've all been waiting for…super speedy logo exporting!
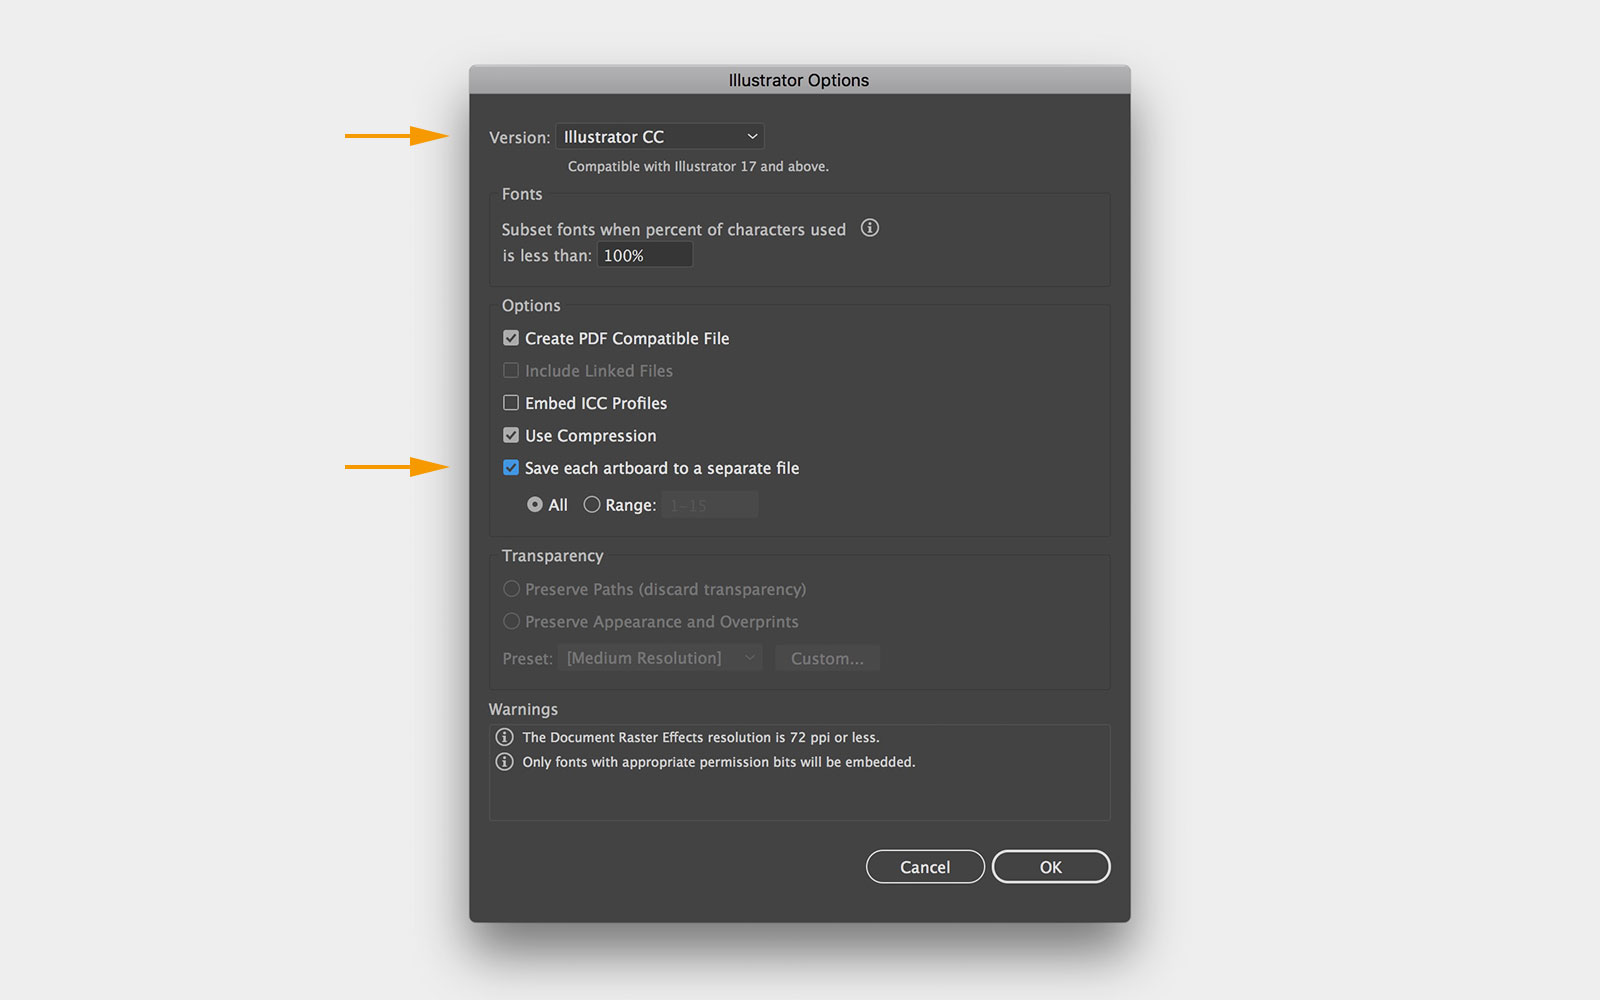
There are a few methods for exporting multiple files at once. The first is using "Save Equally." To save every artboard every bit its own Illustrator file, select File > Save As then choose Adobe Illustrator (ai) from the drib-down menu.
Afterward you lot click save, an Illustrator options window volition pop upwards. Yous need to check "Salve each artboard to a separate file," the choose the "All" radio button and then you can click "Ok."
You can use this aforementioned flim-flam with EPS files. Follow the same steps, except choose Illustrator EPS (eps) from the format dropdown in the save as dialog and then select the "Utilize Artboards" checkbox straight below. Y'all volition also desire to select the "All" radio button.

Export PDF, SVG, JPG, and PNG using "Export for Screens"
Export for screens is a fairly new tool in the Illustrator toolbox. It'due south a suped-up version of the old "Save for Web and Devices" window. You tin can find this window by navigating to File > Export > Export for Screens.
Here's some other pro keyboard shortcut (yous're welcome):
Opt + Command + Due east on Mac
Control + Alt + E on PC.
The Export for Screens window has two tabs, Artboards and Assets. Make sure you are in the Artboards tab. Then follow these steps.
- Select the "All" radio button to ensure all of your artboards are exported
- Choose a directory to consign the logos to
- Add any formats you want to export by clicking the "+ Add Calibration" push button near the bottom of the window
- Enter your customer's proper noun in the "Prefix" field
DON'T FORGET TO Add YOUR Client'S Proper name IN THE PREFIX FIELD. If you lot don't practice this you lot'll have to manually add it to dozens of files. Save yourself the headache.

Afterwards you export all of your impress logos, you need to echo the steps for digital logos using the document you created in the RGB certificate color way.
Organize your logo files
You should at present be sitting on a fatty batch of hot-northward-ready logo files. The only thing left to practise is organize them all into a curtailed and meaningful folder construction. I wrote a post about how to create just such a logo package folder structure. Give information technology a read. You lot tin even download my pre-made folder structure for gratis.
The process I've described to a higher place should drastically meliorate your logo-packet-making efficiency. If you'd like a head start on implementing this process, you can grab my print and digital logo exporting templates right now.

What Size To Create Logo In Illustrator,
Source: https://www.logopackage.com/blog/export-logos-fast-with-artboards
Posted by: reeselationd.blogspot.com
0 Response to "What Size To Create Logo In Illustrator"
Post a Comment