

how to add drop shadow in photoshop
Realistic shadows around objects make photographs look professional and believable. However, you may not have the ability to create photographs in the right settings, or with the correct lighting to achieve the shadows you need.
Receive free ecommerce & product photography tips
With patience and finesse, you can add natural-looking shadows to your product photos in Photoshop. The process takes time, skill and an understanding of how shadows work.
What we'll cover:
- How do you create a shadow in Photoshop?
- Tutorial: How to create a realistic shadow in Photoshop
- Shadow variations
- When to use shadows in ecommerce
- The difference between a drop shadow and a cast shadow
How do you create a shadow in Photoshop?
Objects have two types of shadows: cast shadows and form shadows. What is a cast shadow?, you might be wondering. Cast shadows are shadows around an object that appear on the floor or on other objects around the object. Form shadows are shadows that appear within the object itself.
Both types of shadows are determined by the direction, distance and number of light sources. You can use the form shadows on your object to give you clues as to how a realistic cast shadow will appear.
Before you begin to draw or create your shadow in Photoshop, it's important to understand how shadows work. Cast shadows become lighter and blurrier as they get further from the object.
In this tutorial, you'll learn how to create a realistic shadow in Photoshop using a combination of the Drop Shadow Layer Style, transform tools, the gradient tool, blurs, layer masks and alpha channels.
Tutorial: How to create a realistic shadow in Photoshop
- Isolate your object from the background
- Create a new background behind your isolated object
- Determine your cast shadow color
- Create a drop shadow
- Create a layer from your drop shadow
- Distort the drop shadow
- Create an alpha channel
- Create a gradient within your alpha channel
- Blur selection
- Create a layer mask
- Consider light source and clean up shadows
Step 1: Isolate your object from the background
Open the photo you wish to modify. Once you're in the new file, open your Layers palette by going to Window > Layers. Cut out the object in your photo and place it on a new layer. Give your new layer a name that indicates the background has been removed (such as "isolated") to avoid confusion with other layers as you create your shadows.
You can refer to our tutorial on how to use Magic Wand to isolate an object from its background.

Click on the eye icon next to your background layer to make the background invisible. This way, you'll only be able to see your object against a transparent background.

Step 2: Create a new background behind your isolated object
In your Layers palette, select your hidden background layer. Go to Layer > New Layer, or type SHIFT+CONTROL+N (SHIFT+COMMAND+N on a Mac) to create a new layer. This layer will serve as your new background.
Fill the new layer with a color by going to Edit > Fill. By choosing Color from the dropdown menu, you have the option to choose a custom color.


In the example above, the background was created by overlapping several gradients on top of the fill color.
Step 3: Determine your cast shadow color
Shadows have color, and you can look at form shadows on your object to determine what the color of your cast shadow should be.
Find a form shadow within your object, and use your Eyedropper Tool to select that shadow.
The selected color will appear as your foreground color at the bottom of your Tools palette. Double click on the new foreground color to bring up the Color Picker adjustment dialog box.

Adjust your selected color to be a bit darker and less saturated by moving the selection down and to the left of the color field. Click OK.
Step 4: Create a drop shadow
With your isolated object layer selected, click on the fx button at the bottom of your layers palette and select Drop Shadow.

The Drop Shadow dialog box will pop up. Create a drop shadow by setting your shadow color to your foreground color. The opacity, distance, spread and size levels are not that important right now as you'll be adjusting all that later, but you can use the values in the screenshot below as a starting point.
Once you're satisfied with your Drop Shadow settings, click OK.

Step 5: Create a layer from your drop shadow
Go to Layer > Layer Style > Create Layer to separate your drop shadow from its layer. This will allow you to modify the shadow independent of the object. A warning dialog box might pop up when you go to create the layer; if so, just click OK.

Step 6: Distort the drop shadow
In your Layers palette, select the newly created drop shadow layer.
Go to Edit > Transform > Distort to pull your drop shadow down to the floor.
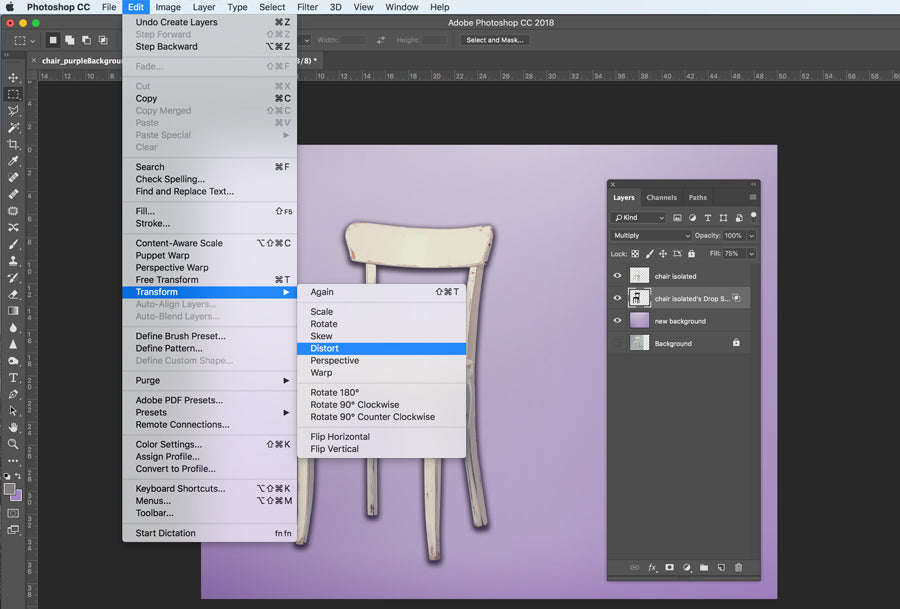
Artistic knowledge comes in handy here; consider where the form shadows are on your object to determine which direction the cast shadow should fall naturally, and think about the vanishing point of your image to determine just how far you should distort the shadow.

If necessary, you can select certain sections of the shadow and transform them independently to ensure the shadow connects to all parts of the object that touch the floor.
Save time and let us bring your products to life with shadows, starting at just $0.25/image.
To do so, set the Blending Mode of your shadow layer to Normal and the fill to 100%.

Draw a selection around the area of your shadow you need to modify using the Rectangular Marquee Tool, and then go to Edit > Transform > Distort to edit that portion of the shadow.

Once you're satisfied with your changes, apply the transformation and use your Paintbrush and Eraser tools to "fix" any edges of your shadows. Then change the Layer Blend Mode of your drop shadow layer back to Multiply, and reduce the Fill for that layer back to 75%.
Step 7: Create an alpha channel
This shadow is starting to look realistic, but remember that in real life, shadows become blurrier and lighter the further they recede from the object. Using an alpha channel is an easy way to control the areas of the shadow that need to blur and lighten.
To create an alpha channel, go to Window > Channels to open your Channels Palette. Click on the Palette menu to select New Channel.

A New Channel dialog box will pop up. You can keep the name as its default, Alpha 1. Under Color Indicates, make sure the Selected Area radio button is chosen.

Step 8: Create a gradient within your alpha channel
In your Channels palette, select your new Alpha 1 channel just as you would select a layer. Make sure the visibility (eye icon to the left of the channel name) is toggled on for all channels.
Select the Gradient Tool from the Tools palette. At the bottom of the Tools palette, make sure the foreground is set to black and the background is set to white.
In the Options palette at the top of your application window, make sure the gradient is set to black-to-white, and the gradient type is linear.
Once your gradient settings are correct, set your cursor at the furthest point of your shadow (or beyond) and draw the gradient toward the part of the shadow that is closest to the object.

The selection will be visible as a red gradient overlaying your image.

Step 9: Blur selection
Once you have created your gradient in your alpha channel, you'll see a red gradient on top of your image, indicating how the mask within the channel interacts with your image. You can toggle the eye icon next to Alpha 1 to make the red gradient invisible so it is not distracting.
Click on the top channel in your Channels palette (either RGB or CMYK, depending on your image's color mode) to select your color channels and deselect your alpha channel.
Go to your Layers palette to make sure you still have your drop shadow layer selected.
Go to Filter > Blur > Lens Blur. A dialog box will show up giving you significant controls over your blur.
Make sure the box next to Preview is checked. Under Depth Map, select Alpha 1 from the Source drop-down menu.
Keep the Blur Focal Distance at 0, and check the box next to Invert.
Slide the Radius to a high number (in this example, it is set to 67). Leave all other values at their defaults. Click OK.

Step 10: Create a layer mask
Go to Select > Load Selection. Choose Alpha 1 from the Channel drop-down options, and make sure the radio button next to New Selection is checked.

Click OK.
You will now see a selection approximating the darkest areas of the gradient you created in your alpha channel.
Select inverse by going to Select > Select Inverse, or by typing SHIFT+CONTROL+I (SHIFT+COMMAND+I on a Mac).
In your Layers palette, click on the Layer Mask icon at the bottom of the palette.
When the mask is applied, the shadow will appear to "fade" as it recedes into the distance. Notice that the thumbnail for the layer mask matches the thumbnail next to Alpha 1.


Step 11: Consider light source and clean up shadows
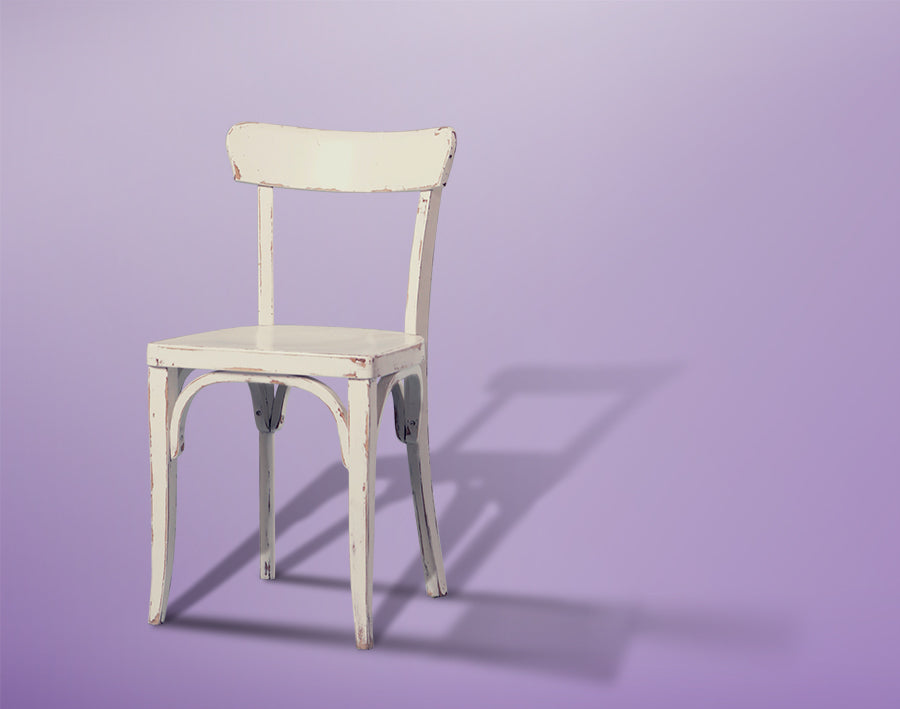
Finally, make sure there are no portions of your shadow that are appearing on the wrong side of your object. So, in the example in this tutorial, there should be no instances of the shadow that appear in front of the object since the light source pushes the cast shadow behind the object. Using the Eraser Tool, carefully remove shadows that don't belong.
Also, note that the shadows of the front legs in the chair image should hit the back legs of the chair. The easiest way to recreate these shadows is to create a new layer above your object, and then, using your shadow color, use the Brush tool to paint in the shadows cast on top of your object. Set the Layer Blend Mode to Multiply and adjust the opacity until it matches the surrounding shadows.
Using shadow variations
If you're placing your object into another photo, you may need to create additional cast shadows in order to match the other shadows in the new background. Once you have finalized your first cast shadow, you can add additional shadows in different directions by repeating the steps above to simulate additional light sources.
You can also easily adjust your shadow so that it appears on a wall behind your object.
After distorting your drop shadow (Step 6), select the area of the shadow that falls onto the wall with the Rectangular Marquee Tool and go to Edit > Transform > Distort to pull the shadow up the wall.

When you create your alpha channel, adjust your colors so that the foreground color is a dark gray (instead of black), and start the gradient at the base of the wall so that your blur and fade are uniform against the surface of the wall.


When to use a drop shadow in ecommerce
Placing products in different settings can help shoppers connect with the product on an emotional level. However, if you're using Photoshop to merge the product into that setting, you'll need to give that product a realistic drop shadow in order for the photo to look believable.
Even if you're simply displaying a product against a white background, adding a realistic shadow helps your product pop against the background and creates a more realistic, professional-looking photo.
Furniture in particular lends itself to the drop shadow technique, adding dimension and depth to your product photos without the technical lighting aspects during the shoot.
Here's an example from The Mood Store, where you can see drop shadows added to several images:

You'll also see this frequently in fashion, apparel and accessories. Kubashi, for example, adds a drop shadow to product photos of baseball hats to add dimension to an otherwise flat image.

The difference between a drop shadow and a cast shadow
Creating a realistic shadow is a much more complicated and rewarding process than just applying a drop shadow to an object. Drop shadows by themselves are roughly the same size and dimension as the object. Rarely in real life would you encounter a shadow that looks just like an unmodified drop shadow. Adjusting your shadow into a three-dimensional cast shadow using the method described above is essential to making your shadow look realistic.
Let us bring your products to life with natural shadows, starting at just $0.25/image.

Becky Kilimnik
Bio: With over 18 years experience as a graphic designer, Becky is passionate about helping people enhance their content by mastering image manipulation software. Becky has worked with a variety of educational publishers in the U.S. and U.K. and has taught design at six universities.
how to add drop shadow in photoshop
Source: https://pathedits.com/blogs/tips/photoshop-tutorial-how-create-realistic-drop-shadow
Posted by: reeselationd.blogspot.com
0 Response to "how to add drop shadow in photoshop"
Post a Comment